Sunday, August 5, 2012

Project Runway- Week 3

So, after last week's candy craptastophy, we are given the. most. boring. challenge EVA' on Project Runway. Also, the most pathetically obvious example of product placement in reality show challenge history.

Contestants were taken to a lot of Lexus cars and given a key. The car to which their  key fit was to be their inspiration for this challenge- creating an Emmy red carpet look for a Project Runway alumni. And by "inspiration," we totally mean your dress must be the color of of your car. I'm sure the designers could barely contain their creative brilliance... and yet they DID. It would have been far more entertaining to watch them use car parts to create accessories for their red carpet look (yes, I realize that's another show).

Oh, but it gets better! Not only must designers dampen their creative mastery and deal with some major Diva issues from PR has-beens, they must also work in teams. Assigned teams. Surprisingly for a random draw, the teams were rather well-balanced with a designers of a higher skill set and a weaker contestant. As Elena pointed out again and again. And again.

My fave Ven won another challenge.


I love Kinley and I love her style. This dress is very much her style but I don't think it speaks "red carpet" at all. Sonija said Kinley could go to church in this dress and no one would even notice. Well, I do think it would be awful nice for church, just not for rubbing elbows with Tom Cruise. I like the detailed pleating. I just wish they had done this in at least a quarter-length gown. Of course, the greatest factor in this design's success was Kinley's attitude because her love for it was evident coming down the Runway.

The same cannot be said for Irena in the Kardashian bride gown created by Gunnar and Kooan. She obviously didn't care to go to the Emmy's.


It's an insult to the judges for this dress to have made the top two. As they are leaving for the runway, Gunnar says this is an "awful white dress" and the judges are going to eat it up. Kooan is traumatized to have to fix the Frankenstein stitching across Irina's backside because the dress makes him "sad, not happy." We learn two things with this creation- a train can cover bad workmanship, and the well-placed accessory and make a bland design appear more extraordinary.

Maybe I am just dazzled by sparkles in this bland, bland challenge, but I like the designs made for April and Valerie. Valerie obviously does not have a model's body, but they really could have done something a little more elegant with her hair. April's dress was original but modest in the front, then caught you with a sexy surprise in the back.


Unsurprisingly (and thankfully), the challenge of teamwork lent drama to this week's episode (since the dresses had so little). First there were Elena's psychotically-laced temper tantrums towards Buffy. And her reason for being such a mean wench? "Because in the Ukraine you have to fight daily for your food to survive." Yeah well... the food during the production of the show is free, so nice try... wench. And as she was sketching out her design, what did we see? The exact same dramatic shoulders silhouette used for hr last two designs. Buffy does lack skill and will be leaving soon, but you have to pity the poor lil' leopard-headed chick for having to put up with the evil brat this week. Hopefully the teaser is not misleading and Elena really has disappeared from the show.

The other candidates for "Cutest Couple" would have to be Christopher and Andrea. Oh, how quickly that showmance faded away within one episode. Christopher went from saying how much he wanted to learn from everyone on the shaow, especially the most experienced member that has dressed celebrities, to not having the ability to be rude enough to say about Andrea what he wanted to on the runway. And, with reason! I wanted to like her... but I just can't. I don't know how any student is going to cinsder her a capable mentor after this show. She laughs about spending all day "doing really crappy work." She knows that she's close to kissing Heidi goodbye, that's why she's playing "sour grapes"- saying before the critique, "If I get knocked out it's a relief at this point." I hate-hate-HATE when anyone on a reality show says that. It's such a cop-out, an effort to look like you don't care when you know you are about to lose. I think Andrea is the one that should have went home.


The dress that Alicia and Raul made was frumpy. It was bland and not the perfect fit, but the basic construction far exceeded that of Anya's gown made by Christopher and Andrea- a Hershey bar interrupted by a studded belt according to Kors. The slit is too high. The seam for the slit is crooked and poorly stitched. The cowl neck is obviously a make-shift add-on, and the eye-hooks were grossly visible on the back of the neck.

Unfortunately Raul said he "hated every single minute of this challenge" and it shows. It would be quaint to say that this week's episode was a good lesson in seeing how attitude affects work, but that fails when Gunnar's "awful dress" that makes Kooan "sad, not happy" is praised on the runway.

Saturday, August 4, 2012

Tree of Life Pendant

I am joining Ginger Snaps Crafts for {wow me} wednesday with this little creation. It's my third attempt at jewelry-making. You can see the other by visiting the "What I'm Crafting" tab above. Thanks for stopping by!

These pendants were one of my first discoveries on Pinterest that I fell in love with. I love trees. I love statement jewelry. Add the two together and you get the Tree of Life pendant. I looked through several examples, and had a few abandoned attempts before I invested in this design and finished it... and l-o-v-e it!


My biggest challenge was trying to find a silver hoop to start the project. The "magical" size was not to be found. So I narrowed my choices down to a set of bracelets I found at Michael's that were 2 1/2 inches in diameter, and a hodgepodge packet of rings in various sizes- the largest being 1 1/2 inches.


Well, since we are in the south, I decided to "Go Big or Go Home!" (even though I was already home)


I did try to make my own circle from a heavy gauge wire as many of the tutorials suggested. But that did not go well at all. Many failed attempts to make a silly circle!


Next you are going to take medium-gauge wire, cut many strips about 8-inches long each and bend in half. This wire came in an unmarked spool from Wal-Mart for $1. I would guess it's about 18-20 gauge.


There are many methods to attach the wire to the hoop. What worked best for the aesthetic I wanted was to loop the wire around the hoop once and then twist tightly twice.


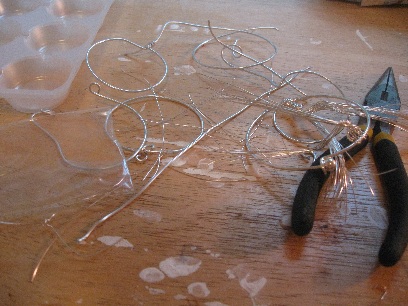
Continue this method until your trunk is the desired thickness. I used 24 wires. However, I wanted a design with a very wide trunk and... well, this pendant is close to the size of a CD hanging around my neck (not really... but close ;).


Then, it's just twist- twist- twist. This is when your creativity shows and you make the piece yours. Do you want many or few branches? Keep in mind that the more you twist, the less beading you can add. 


Once you have figured out all your branching, then begin adding your beads, one strand of wire at a time.


As your beads reach the hoop with each wire, use your needle-nose pliers to tightly wrap the remaining wire around the hoop.


Just continue this method all the way around the hoop. When you have excessively long wires in some areas, you can trim them before beading to give yourself an easier branch to work with. I also cut some branches shortly after the twist and wrapped it down on the twisted wired beneath it, just to be able to comfortably fit all all branches around the hoop.


I did not like the inconsistent look of the sporadic wrapping around the hoop. So, I took a lighter wire, 24-gauge, and wrapped the entire hoop. It was easiest to do this by folding the wire in half and just tucking it between any two random branches then using needle-nose pliers to wrap it tight along the hoop, replacing with a new wire and repeating when needed.


The end result was a much more meticulous look.


Below are some ideas for other Tree of Life pendants I want to try!


Friday, August 3, 2012

Big Brother- Noneviction Week (The Reset)

Finally caught up on all the episodes that aired (and drama that went down) while I was out of town.
Another good week BB, lots of good (yet unsurprising) twists.

This not-a-showmance between Shane and Danielle is getting rather boring. I find it deliciously evil that Shane outright declared that he would have preferred that JoJo stayed in the house... but since she didn't, he'll just hook up with Danielle... but not hook up... but hook up. Obviously, CBS in a desperate attempt to create some showmance this season, keeps peppering them with leading questions and editing the aired clips to make it look like more than it is.

Much more interesting is Rocker Chick hitting on Danielle! Oh come on, you know she was... that patio pow-wow when she told Danielle that she likes to treat her woman like a queen and "make love to her brain." Even though the President of Chick-Fila may bring eternal damnation onto CBS, that could be an interesting twist to the summer's plot. The love battle between Shane and Rocker Chick for Danielle's affection would definitely be more entertaining than the spin-a-bottle kiss that had Danielle acting like an innocent bride on her wedding night.


I have seen my share of odd, lame, exciting, confusing, and disgusting competitions on reality shows, but there really aren't words to describe the coahes' competition thi week. It was a blurry neon blend between a cheesy adult film and an 80's Olivia Newton John video.


Frank definitely has game! From his directing Boogie to give Ian the $3k following this challenge to his super-secret alliance with Shane. That worked well. Of course, we have to pity the neglected son of wrestling legend, Sid Vicious! Oh, what a twist that was! Not. Who cares? What was more sad that Ian blubbering over the $3k? Frank's mom tenderheartedly sharing that Frank just doesn't know how much Pappa Sid is "into the show." As if that makes up for all those missed t-ball games. I bet he is "into" the show... and any potential path it could get him back to the limelight. I am not a Franko-fan and cringe every time he and Boogie do their little Dr. Will-flashback hip checks.


What I am a big fan of though, is the Diva War between Janelle and Will. Janelle is going to declare to Brittany that "when I get sad I just change my emotions," then try to turn on the waterworks as she claims to be so upset that Will thinks she doesn't respect him as a player. And? He read her- like. a. book. "Act One, Take Two."

I was also a big, BIG, fan of the Yelling Chef finally being on the block. We were this close to getting him out of the house. THIS close. Oh, but he made himself so much more adoring this week. First there was the breakfast delivered to Shane, in bed, the morning after he won HOH, delivered with, "Sir Shane: This is my apology and ass kissing for the week." Then, Janelle sends him up to the loft to talk "hearts and butterflies" with this week's powers to be, and what does Soul Patch do? Curse to knee-sock wearing Shane about how much "THIS SUCKS." Oh but out brave brave nearly-evicted lil' soldier redeemed himself in his "last chance" speech, right? He declared that "The President of the United States has the right to Veto while in office," and he implores Shane to "Be like the President." Such powerful words.

Joe is a one-man idiot parade, as Britney's impression so clearly demonstrated.

THIS close, but saved by the twist. Well, one player was saved by the twist. Frank probably would have the numbers stacked against him and left, but still... SO close. Those stacked odds are what made Superstar Shane feel safe enough to stab Frank in the back and put him on the block. But the twist, oh the twist... he better hope Frank doesn't win HOH soon.

Thursday, August 2, 2012

The "New" English


I am at James Madison University for two days to continue a course that I began at William & Mary last year. (It is part of the School-University Research Network-SURN, a program involving both institutions.) At the onset, the program was called the Capstone English Academy. Since then it has morphed into the Senior English Academy. The word Capstone indicates an ending, having reached the pinnacle. English teachers can get really caught up in word choices.

The impetus of the course was the Career & College Readiness Initiative spearheaded by our governor in response to the low retention and graduation rates of Virginia Colleges.  The objectives address the misconception that only students enrolled in academic or advanced high school courses are the ones that are college-bound. Those students that fall into the margins of being college-bound but not enrolled in college-prep courses are the easiest prey to those incompletion rates. This is an epidemic close to my heart because my son was one of those students and now he is one of those statistics. He is, of course, neither the first or last student I will see this happen to.

Last year the VDOE joined SURN in creating a course to prepare English teachers for instructing this "last chance" course for those struggling or unengaged readers. My biggest concern last year was that the Senior year of high school was simply too late to completely change the framework of how literature is taught in the classroom. Thankfully this year, most likely due to the realities of a starving education budget statewide making it unlikely new courses will be added to many curriculums, the focus instead is on incorporating these new methods of engagement and assessment across the entire high school English framework. This makes much more sense to me.

There is always a "new" way of teaching being introduced to education. How often have we heard the phrase "New Math." It is a necessity though... because the students sitting in our classrooms are changing. I am not going to create a laundry list here of all the ways in which today's student differs from yesterday, from us as a student, from tomorrow's students. All those comparisons could be a post within themselves. What is most important is understanding the evolution of education.

Society changes. Students changes. Therefore learning methods change and we, as teachers, must change. What this new method of teaching proposes is moving away from the classics, from assigned text sets, and allowing students to chose their own literature to read. The premise of the course is that when there is student choice, the reader will become engaged in literature and the same objectives can be completed. It proposes an organic style of learning where there is an exchange of information between student and teacher versus the traditional information output and input model of communication.

This is not an easy concept to grasp. Most teachers fall into the field of English because of a personal love of literature. It is alien to think of breaking the mold of reading a classic, assigning comprehension questions, quizzing and testing on the literature, and writing an essay response.  How is any high school student that has not read Romeo & Juliet going to become a functioning member of modern day society after graduating high school. Seriously? The horror!


Change is hard. We all have our comfort zones of teaching- lesson plans that we can fall back on without much prep or personal engagement. Incorporating this student-centered style of learning, especially in an educational environment framed by high-stakes standardized testing, is an interesting yet hard concept to adopt. For me, this upcoming school year will be about finding the balance between meeting learning objectives and fostering student engagement.

Wednesday, August 1, 2012

Tuesday, July 31, 2012

An Old Friend with a New Look

I've been spending time with an old friend lately. I met her during my Home Economics class in high school.


Perhaps you know Betty. She's written a few books.


I made a Quiche Lorraine for breakfast yesterday morning and Chicken Paprikash for dinner tonight. And while I love (LOVE) a good quiche, Chicken Paprikash was fun to make just because it's fun to say. Paprikash!

While googling for a pic of Betty, I was surprised to see the transitioning images of her over the years.


I come to teaching from a background in advertising, so media trends and target audiences have fascinated me since the days of Darwin making pitches to clients on Bewitched. It seems that "Betty" has grown younger over the years (and much kinder looking than that 1936 school marm version). Isn't it funny how the 1969 version looks more modern than the 1972 version?

The new Betty seems ambiguous in many ways. She has the image of having been a soccer mom but at an age to have just outgrown those carpooling teenaged athletes days (because some of us aren't 56 when that day comes). Fifty-six. Paprikash!

She's also racially ambiguous, Caucasian but with a strong hinting of ethnicity. Being racially ambiguous is highly marketable. I learned that watching America's Next Top Model. (Educational programming has many definitions ;)

However, what stands out most to me about this newest morphing of the "Batter Queen" is that in this newest age of technology, she looks purely computer generated and thus far more fake than any earlier version. I don't understand why they would not chose to use a real model versus a Sim's neighbor. The "ambiguous" identity does not make me feel any more relatable to the marketing brand. Odd.

Paprikash!

Quiche Lorraine


Ingredients:
  • Pie Crust
  • 6 slices bacon
  • 1 medium onion, sliced
  • 3 beaten eggs
  • 1 1/2 cups milk
  • 1/4 tsp salt
  • Dash ground nutmeg
  • 1 1/2 cups shredded Swiss cheese (6 ounces)
  • 1 Tbsp all-purpose flour

Directions:

1. Line pastry sheet with a double thickness of foil. Bake at 450 degrees for 8 minutes. Remove foil and bake for 4-5 minutes more or until pastry is set and dry. Remove from oven. Reduce oven temperature to 325 degrees.

2. In a large skillet, cook bacon until crisp. Drain, reserving 2 Tbsp drippings. Crumble bacon and set aside. Cook sliced onion in reserved drippings until tender but not brown; drain.

3. In a medium mixing bowl stir together eggs, milk, salt and nutmeg. Stir in the crumbled bacon and onion. Toss together shredded cheese and flour. Add to egg mixture; mix well.

4. Cover edge of crust with foil to prevent over-browning. Pour egg mixture into hot, baked pastry shell. Bake at 325 degrees for 35 - 40 minutes. Let stand 10 minutes before serving.

Chicken Paprikash


Ingredients:
  • 2 - 2.5 lbs of meaty chicken pieces (breasts, thighs, drumsticks)
  • 1 Tbsp cooking oil
  • Salt & Pepper
  • 1 large chopped onion (1 cup)
  • 3-4 tsp Paprika
  • 3/4 cup chicken broth
  • 1/4 cup dry white wine (or white cooking wine)
  • 8 ounces sour cream
  • 2 Tbsp all-purpose flour

Directions:

1. Skin chicken. Rinse chicken and pat dry. In a 12-inch skillet, cook chicken in hot oil about 15 minutes or until lightly browned, turning to brown evenly. Sprinkle with salt & pepper. Remove chicken from skillet and set aside.

2. Add onion and paprika to skillet; cook until onion is tender. Return chicken to skillet, turning pieces to coat with paprika mixture. Add broth and wine to skillet. Bring to boiling then reduce heat. Cover and simmer for 35 to 40 minutes or until chicken is tender and no longer pink. Transfer chicken to a serving platter and keep warm.

3. For sauce, skim fat from pan juices. Measure 1 1/2 cups of juice, adding water if necessary. In a mixing bowl, stir together sour cream and flour; gradually stir into pan juices. Pour into skillet. Cook and stir until thickened and bubbly. Cook and stir for 1 minute more.

4. Spoon some of the sauce over chicken. Serve with hot cooked noodles or rice.

Monday, July 30, 2012

It Sucked and then I Cried


It Sucked and then I Cried: How I Had a Baby, a Breakdown, and a Much Needed Margarita by Heather Armstrong

Heather Armstrong is the blogging phenomenon better known as dooce. She lost her job for writing about her co-workers long before blogging became the "thing to do," and has since become a self-professed "professional blogger." (They live well. How is this possible?) I have read dooce's blog on and off since I discovered it many years ago after the Blogher controversy during which another Mommy Blogger referred to her as the "mythical troll" of blogging, which was taken very offensively by her fans (go figure).

When I saw on her web page that she had written this book, I tried to get a copy with no luck. Then, I found one at the fill-a-bag for $5.00 library book sale in our neighborhood. (Perhaps that should have been a hint?)

The tone of this memoir was similar to that of her blog, which I enjoy. However, it was a bit much to continuously digest over 253 pages. Have you ever talked to someone who is always trying to build up to the laugh? That's what the narration of this book felt like. There was definitely humor. There was humor safely cocooning dark subjects, namely postpartum depression (including a brief visit to the psychiatric ward). But there was always humor.

For example, her commentary on Morning Sickness:
I come from a long line of Southern women who were sick then entire nine months of their pregnancies, my mother and sister included, and although I was the first woman in my family stubborn enough to reject the whole notion of pantyhose, I suspected that I would be forced through defective genes to suffer forty weeks of incessant gut-churning, face-contorting, Nacho Cheese Doritos-laden vomit.

Expectantly, the novel also includes several jibes at the Mormon religion, which both Heather and her husband were raised in... and left... then moved to Salt Lake City... UTAH. It borders offensive but doesn't quite reach there, much in the same way only a black comedian can get away with some jokes.

In ironic retrospect I would have to say that reading the novel was like pregnancy, or giving birth. It was a bit painful. I wanted to finish it, but I just couldn't get through it fast enough. Reflecting back on it now though I can appreciate it more than during the actual experience of reading it. Foremost because it had this directly non-fairy detail demystification of, 'You may think you know what this is  going to be like, you may have read all the important books, you may have all kinds of people giving you advice in your life, but they're all lies. Lies. All of them. Here's the real deal.'


Sunday, July 29, 2012

Button & Ribbon Necklace

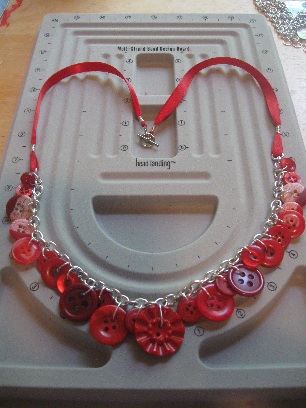
Yesterday while the men were a'fishin and the baby was a'sleepin, Momma went a'craftin and made this funkalicious necklace! I love all things BUTTONS and have a fondness for ribbon too. I had become recently frustrated working through various tutorials with another necklace project, so I
decided to just "wing it" and come up with my own lil' creation... which I love!


Keep three things in mind with this supply list and some of the directions:
#1- I have a large neck.
#2- I like to wear my necklaces long (or find myself claustrophobically clawing them away from my neck).
#3- I have a pretty big button collection to work with.

So, you may want to make adjustments anywhere along this process to fit your tastes, supplies, and needs. 

The materials I used were:
- 12 inches of chain (You want it to be a bit heavier and bigger to handle the weight & appearance of buttons. I used some from a 7 yard spool I bought at Michaels; Brand name is "Bead Landing.")
- 4 pieces of a light gauge wire, each cut to 4 inches in length. (I used 24 gauge.)
- 9 mm jump rings ( I used 25 of these.)
- A tool to open & close jump rings (I used my 3-in-1.)
- Buttons! (also used 25 of these)
- 2 pieces of ribbon, 9 inches in length each
- Toggle Closure
- Beading Board (optional, of course)


And... This is what I did:


After having already sorted my mountain of buttons by colors with an earlier project, next I sorted through the red ones for this project.
(Obviously this isn't an important step to the non-OCD tinged of us.)


First I chose what would be the center button for the necklace since that would the "statement piece." Then I chose to build it symmetrically on both sides.
I thought a Beading Board was a frivolous purchase, but still got one when I saw them 50% off at Michaels and I had a coupon and I
 get a Teacher's discount, so it ended up being 75 cents. I'm really glad that I did now.
It helped in visualizing the lay-out much more than just positioning them on the work table would have.


Using the 9mm jump rings, I attached the buttons to the chain. I wanted an "intentionally cluttered" look. So, I chose to work with the larger buttons first and spaced them with three open chain links between them. This was my first time working with jump rings, so a few went to waste, but it was pretty simple & quick once you got into the groove. (I only used my teeth to close few of them ;)


Next, I chose the smaller buttons to fill in the gaps between the ones already attached.


Having left three empty links between each of the first set of buttons, I then went back to the chain and added one smaller button
between each of the larger ones. The pattern this created in the end was big-skip-small-skip-big-skip-small-skip-big-etc...


I varied the pattern on both ends by finished with two of the smallest buttons on the necklace.
It gave it a nice graduated look, as if tapering off.


Next loop one piece of the ribbon through the end of the chain. Then, wrap one piece of wire around the two-ribbons, about 2-fingers width from the chain to secure them together, and the ribbon to the chain. This one is wrapped about 11 times and then I cut off the excess. Be mindful of where you are cutting to make it pretty or make it hidden! Also, use your needle-nose pliers to wrap! It is much cleaner than just using your hands to twist. (I just figured this out and am trying to sound experienced here.) Of course you are going to repeat this entire process to the opposite side of the necklace.


Next, I used a small wire to wrap the top of each ribbon in the exact same fashion as before. For this necklace I left enough wire at the top of the wrap to attach the toggle closures. Next time though, I will attach the wire to the closure first and then wrap the ribbon. So, I suggest trying that way instead.


This photo was taken before I used a lighter to singe the edges of the ribbon just a bit to clean it up.


And there you have it, you're own funkalicious button and ribbon creation!
I am going to try some other colors and variations of this- will post pics soon!


DISCLAIMER: "Funkalicious" was not a word in my vocabulary prior to this post... but feel free to use it as your own!