Showing posts with label Crafting. Show all posts

Wednesday, January 23, 2013

Will you be my Valentine?

I hearby proclaim by the power of all that is crafty to the Pinterest gods that I am going to make Valentine's for Benjamin's pre-school class! No Wal-Mart bargain boxes of V-cards for me! Below are the five-ish ideas I am favoring. The two goals are reasonably priced and easy enough to craft that I won't procrastinate getting around to doing it!
 
 
Love Bug Valentines by dandee- These are boyliscious! I like that they are candy-free. Benjamin's class buddies are at that age where bugs are equally "Ewww!" and fascinating! The posting includes the free PDF printable for the adorable Mason jar cards. I am guessing that I could get scrap book paper and a tube of bugs for this from Michaels pretty cheapo!


Have a Ball Valentines also by dandee (Is she super-crafty mom or what? I will avoid the guilt-ridden snarky comment that she must not have a job.) These propose an even easier level of craftiness and higher level of kiddie excitement. Pretty sure I still have some treat bags on hand from the last bake sale- card should be easy to print and ball easy to find. Also, just in case there is too much of the "Ewww" factor with the bugs, who doesn't want a ball? (I want a ball!) And the kiddos in his class should be just old enough for the sheltering OCD parents not to freak about this being a "choking hazard."


You Blow Me Away by Pinafores & Pinwheels is a good fall-back. I don't think bugs or balls will be hard to find per se, but bubbles are an easy trinket to come by. This specific project includes a Blow-Pop also but I would nix that- because 2/3 is too young to be chewing gum... and because, let's face it, I loathe gum chewing, in general. My main hesitation with this is I foresee bubbles being put on a shelf until another time, whereas bugs or balls can be played with anytime/anywhere.
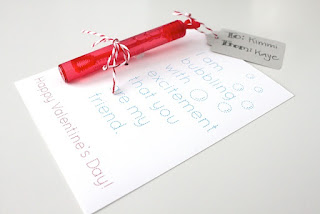


Bubbling with Excitement by Simply Modern Mom offers another "Bubble" alternative for Valentine cards. The post includes the free download to the printable cards (4 per page unlike the other printables, which only have 1). This would pretty cheap & easy in mass with the wedding bubbles at Wal-Mart... Thinking I like this theme overall to use for favors for any "bubbling with excitement" celebration. Going to have to mentally bookmark this idea for Key Club kick-off, Relay Day, etc.


Fishbowl Valentines- The inserts for the "fish bowls" are a printable PDF for sale on Etsy. Actually the seller has a whole series of these printable inserts for different occasions for $5. I don't want to rob crafting enterprising but if I go this route, I will have to play around to see what I can create. These have cute sayings like: "Glad We're in the Same School," "I Saw You and I was Hooked," and "You're the Only Fish in the Sea for Me!" Mayyybeee I even have a Cricut image for the fishbowl insert? I tend to rank this Valentine option pretty high because Jason is a Swedish fishaholic and Benjamin is on the hunt for them whenever he rides in Dad's truck.


Butterfly Valentine are suggested by Skip to my Lou "if you need something quick and easy." Her post includes the printable stencil which would be easy to zip right off the printer on some pink copy paper. I'm not a fan of the googly eyes though. Other than being potentially unsafe, I find them rather distracting. Perhapsss I could get ambitious and do these for allll my kids... hmmm... If I don't have small heart punches, I'm sure I could find a couple small ones cheap-cheap at Michaels. However, I know I can spit out a bunch real quick with the Cricut because I did so with the Valentines I made last year!


Blow Me a Kiss Valentines found At Second Street are a ridiculously fun idea! It is with great frustration that I am making myself bank this idea for another year or two until the kiddos can master these lip whistles better. But how fun! fun! fun! Can't wait!


Crayon Heart Valentines by Whipperberry is another Valentine idea I am going to bank for a couple of years until Benjamin's playmates can appreciate the awesomeness that are these upcycled crayon bits. It'll also give me some time to save up the crayon booty to make them! Oh, how I wish I had thought of this project when Benjamin was in the stage of breaking crayons every time he used them and I just threw them away.

Saturday, August 4, 2012

Tree of Life Pendant

I am joining Ginger Snaps Crafts for {wow me} wednesday with this little creation. It's my third attempt at jewelry-making. You can see the other by visiting the "What I'm Crafting" tab above. Thanks for stopping by!

These pendants were one of my first discoveries on Pinterest that I fell in love with. I love trees. I love statement jewelry. Add the two together and you get the Tree of Life pendant. I looked through several examples, and had a few abandoned attempts before I invested in this design and finished it... and l-o-v-e it!


My biggest challenge was trying to find a silver hoop to start the project. The "magical" size was not to be found. So I narrowed my choices down to a set of bracelets I found at Michael's that were 2 1/2 inches in diameter, and a hodgepodge packet of rings in various sizes- the largest being 1 1/2 inches.


Well, since we are in the south, I decided to "Go Big or Go Home!" (even though I was already home)


I did try to make my own circle from a heavy gauge wire as many of the tutorials suggested. But that did not go well at all. Many failed attempts to make a silly circle!


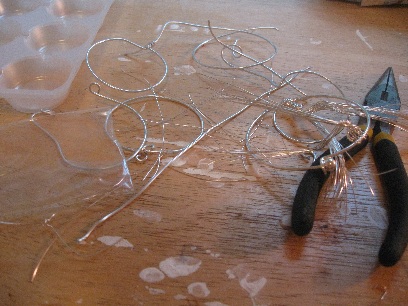
Next you are going to take medium-gauge wire, cut many strips about 8-inches long each and bend in half. This wire came in an unmarked spool from Wal-Mart for $1. I would guess it's about 18-20 gauge.


There are many methods to attach the wire to the hoop. What worked best for the aesthetic I wanted was to loop the wire around the hoop once and then twist tightly twice.


Continue this method until your trunk is the desired thickness. I used 24 wires. However, I wanted a design with a very wide trunk and... well, this pendant is close to the size of a CD hanging around my neck (not really... but close ;).


Then, it's just twist- twist- twist. This is when your creativity shows and you make the piece yours. Do you want many or few branches? Keep in mind that the more you twist, the less beading you can add. 


Once you have figured out all your branching, then begin adding your beads, one strand of wire at a time.


As your beads reach the hoop with each wire, use your needle-nose pliers to tightly wrap the remaining wire around the hoop.


Just continue this method all the way around the hoop. When you have excessively long wires in some areas, you can trim them before beading to give yourself an easier branch to work with. I also cut some branches shortly after the twist and wrapped it down on the twisted wired beneath it, just to be able to comfortably fit all all branches around the hoop.


I did not like the inconsistent look of the sporadic wrapping around the hoop. So, I took a lighter wire, 24-gauge, and wrapped the entire hoop. It was easiest to do this by folding the wire in half and just tucking it between any two random branches then using needle-nose pliers to wrap it tight along the hoop, replacing with a new wire and repeating when needed.


The end result was a much more meticulous look.


Below are some ideas for other Tree of Life pendants I want to try!


Sunday, July 29, 2012

Button & Ribbon Necklace

Yesterday while the men were a'fishin and the baby was a'sleepin, Momma went a'craftin and made this funkalicious necklace! I love all things BUTTONS and have a fondness for ribbon too. I had become recently frustrated working through various tutorials with another necklace project, so I
decided to just "wing it" and come up with my own lil' creation... which I love!


Keep three things in mind with this supply list and some of the directions:
#1- I have a large neck.
#2- I like to wear my necklaces long (or find myself claustrophobically clawing them away from my neck).
#3- I have a pretty big button collection to work with.

So, you may want to make adjustments anywhere along this process to fit your tastes, supplies, and needs. 

The materials I used were:
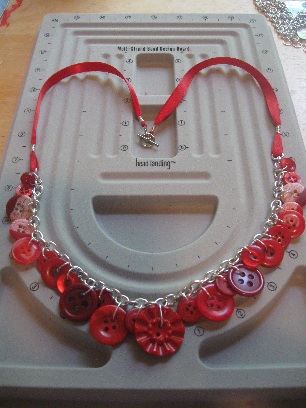
- 12 inches of chain (You want it to be a bit heavier and bigger to handle the weight & appearance of buttons. I used some from a 7 yard spool I bought at Michaels; Brand name is "Bead Landing.")
- 4 pieces of a light gauge wire, each cut to 4 inches in length. (I used 24 gauge.)
- 9 mm jump rings ( I used 25 of these.)
- A tool to open & close jump rings (I used my 3-in-1.)
- Buttons! (also used 25 of these)
- 2 pieces of ribbon, 9 inches in length each
- Toggle Closure
- Beading Board (optional, of course)


And... This is what I did:


After having already sorted my mountain of buttons by colors with an earlier project, next I sorted through the red ones for this project.
(Obviously this isn't an important step to the non-OCD tinged of us.)


First I chose what would be the center button for the necklace since that would the "statement piece." Then I chose to build it symmetrically on both sides.
I thought a Beading Board was a frivolous purchase, but still got one when I saw them 50% off at Michaels and I had a coupon and I
 get a Teacher's discount, so it ended up being 75 cents. I'm really glad that I did now.
It helped in visualizing the lay-out much more than just positioning them on the work table would have.


Using the 9mm jump rings, I attached the buttons to the chain. I wanted an "intentionally cluttered" look. So, I chose to work with the larger buttons first and spaced them with three open chain links between them. This was my first time working with jump rings, so a few went to waste, but it was pretty simple & quick once you got into the groove. (I only used my teeth to close few of them ;)


Next, I chose the smaller buttons to fill in the gaps between the ones already attached.


Having left three empty links between each of the first set of buttons, I then went back to the chain and added one smaller button
between each of the larger ones. The pattern this created in the end was big-skip-small-skip-big-skip-small-skip-big-etc...


I varied the pattern on both ends by finished with two of the smallest buttons on the necklace.
It gave it a nice graduated look, as if tapering off.


Next loop one piece of the ribbon through the end of the chain. Then, wrap one piece of wire around the two-ribbons, about 2-fingers width from the chain to secure them together, and the ribbon to the chain. This one is wrapped about 11 times and then I cut off the excess. Be mindful of where you are cutting to make it pretty or make it hidden! Also, use your needle-nose pliers to wrap! It is much cleaner than just using your hands to twist. (I just figured this out and am trying to sound experienced here.) Of course you are going to repeat this entire process to the opposite side of the necklace.


Next, I used a small wire to wrap the top of each ribbon in the exact same fashion as before. For this necklace I left enough wire at the top of the wrap to attach the toggle closures. Next time though, I will attach the wire to the closure first and then wrap the ribbon. So, I suggest trying that way instead.


This photo was taken before I used a lighter to singe the edges of the ribbon just a bit to clean it up.


And there you have it, you're own funkalicious button and ribbon creation!
I am going to try some other colors and variations of this- will post pics soon!


DISCLAIMER: "Funkalicious" was not a word in my vocabulary prior to this post... but feel free to use it as your own!

Saturday, July 28, 2012

Toddler Fingerprint Stencil

The big boys went to the Eastern Shore for a fishing excursion today (all three of them, lol).
While they were away, Benjamin and I had lots of time to play- crafty play that is.


I have seen several of these Toddler Masterpieces on Pinterest (where else?).
So, we decided to give one a try, on a smaller scale than some of the massive murals I have seen done.

We started with a small canvas, 8x10. I used black vinyl to cut a stencil with the Cricut.
Specifically for this project, I cut a 4" (real size) B with the Roly Poly font on Plantain Schoolbook.


I affixed the vinyl letter to the canvas and covered the kitchen table with a plastic tablecloth that I use for messy projects.
(Pick these up after holidays at Wal-Mart for 50 cents. The always come in handy! Way cheaper than tarps.)


For paint, I used the every day craft paint, I think "Apple Barrel" brand, that I had on hand. I stripped Benjamin down to the diaper (because I would never have him running around in the house in just a diaper already, nooo), and plopped him up on the kitchen table. I squirted a little paint on a styrofoam plate and just let him play. Take note of how he began very meticulously dotting the canvas with his fingertips.


It didn't take too long for him to realize that playing in the paint was as (more?) fun than painting on the canvas.


Each time he would swirl a new layer of paint on the canvas, he would throw his hands up in the air and shout "TA-DA."
(He was quite confident in his artistic ability apparently.)


He would announce the color each time he used it too... or maybe I should say announce "a color" each time he used it. Because we worked with such a small canvas, I decided to stick with the yellow-orange- red pallet. According to the prism, all the colors of the rainbow make white... but in finger painting, they make MUD.


Clean-up for the project was pretty easy too!


Friday, July 20, 2012

Button Monogram


This evening, I returned to the Button Monogram project that I abandoned earlier in the week when I could not make a final decision on whether to use an eclectic mix of button colors or a hodgepodge of white buttons. Obviously, I chose the latter. This is a pretty self-explanatory craft. Pretty easy, and since I had all the supplies needed lurking in my closet, it cost $0.00 to do!

Supplies Needed: small canvas, fabric (large enough to wrap canvas), hot glue & gun, buttons, ribbon, and a pencil


Before firing up the glue gun, you will want to decide on your fabric and button choice. My first attempt at this project was using the variety of buttons so I spread them over the fabric choices to decide. When I changed my mind to using all white buttons today instead, I used this same technique and swathed all white buttons over my fabric choices to see which combination I liked best.


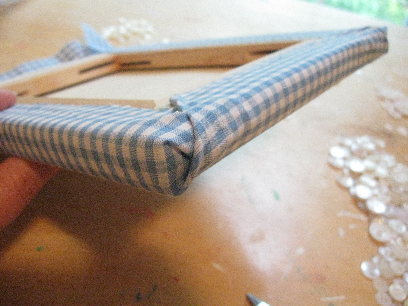
Once decided, you are going to wrap the canvas "Christmas present style" and hot glue the corners in. Avoid the urge to use too much glue because it will make the bottom edges look lumpy and take away from the overall appearance of your project.


Next, separate your entire button collection into coordinating colors, and once you have decided which color to use, separate those buttons into small vs. large, 4-hole vs. 2-hole, matte vs. shiny. Actually, I am kidding. Do not do this unless you are OCD-tinged like some of us and want to turn a 1-hour project into a 4-hour one!


Instead, with a pencil sketch out your chosen letter directly on the fabric. Do not bother trying to be fancy or cutting out a stencil for this. Your buttons are going to ultimately determine the shape for you and too much pre-planning would be a waste of time. Next, lay out your first layer of buttons on the sketched alphabet. Don't glue until you have laid it out first and are pleased. Use your biggest buttons first to form a base Don't worry that it looks too uniform, or "neat," adding the layers of buttons will give a personality!


Then... you just keep gluing and gluing until the World Tetris Champion could not possibly find another spot to fit a button. It works best to progressively with with smaller and smaller buttons so the tiny ones can be clearly seen on top. To hang my canvas, I simply hot glued a piece of ribbon to both sides of the back canvas and tied them together in a bow to hide the nail hanging the print.