Yesterday while the men were a'fishin and the baby was a'sleepin, Momma went a'craftin and made this funkalicious necklace! I love all things BUTTONS and have a fondness for ribbon too. I had become recently frustrated working through various tutorials with another necklace project, so I
decided to just "wing it" and come up with my own lil' creation... which I love!

Keep three things in mind with this supply list and some of the directions:
#1- I have a large neck.
#2- I like to wear my necklaces long (or find myself claustrophobically clawing them away from my neck).
#3- I have a pretty big button collection to work with.
So, you may want to make adjustments anywhere along this process to fit your tastes, supplies, and needs.
The materials I used were:
- 12 inches of chain (You want it to be a bit heavier and bigger to handle the weight & appearance of buttons. I used some from a 7 yard spool I bought at Michaels; Brand name is "Bead Landing.")
- 4 pieces of a light gauge wire, each cut to 4 inches in length. (I used 24 gauge.)
- 9 mm jump rings ( I used 25 of these.)
- A tool to open & close jump rings (I used my 3-in-1.)
- Buttons! (also used 25 of these)
- 2 pieces of ribbon, 9 inches in length each
- Toggle Closure
- Beading Board (optional, of course)

After having already sorted my mountain of buttons by colors with an earlier project, next I sorted through the red ones for this project.
(Obviously this isn't an important step to the non-OCD tinged of us.)

First I chose what would be the center button for the necklace since that would the "statement piece." Then I chose to build it symmetrically on both sides.
I thought a Beading Board was a frivolous purchase, but still got one when I saw them 50% off at Michaels and I had a coupon and I
get a Teacher's discount, so it ended up being 75 cents. I'm really glad that I did now.
It helped in visualizing the lay-out much more than just positioning them on the work table would have.

Using the 9mm jump rings, I attached the buttons to the chain. I wanted an "intentionally cluttered" look. So, I chose to work with the larger buttons first and spaced them with three open chain links between them. This was my first time working with jump rings, so a few went to waste, but it was pretty simple & quick once you got into the groove. (I only used my teeth to close few of them ;)

Next, I chose the smaller buttons to fill in the gaps between the ones already attached.

Having left three empty links between each of the first set of buttons, I then went back to the chain and added one smaller button
between each of the larger ones. The pattern this created in the end was big-skip-small-skip-big-skip-small-skip-big-etc...

I varied the pattern on both ends by finished with two of the smallest buttons on the necklace.
It gave it a nice graduated look, as if tapering off.

Next loop one piece of the ribbon through the end of the chain. Then, wrap one piece of wire around the two-ribbons, about 2-fingers width from the chain to secure them together, and the ribbon to the chain. This one is wrapped about 11 times and then I cut off the excess. Be mindful of where you are cutting to make it pretty or make it hidden! Also, use your needle-nose pliers to wrap! It is much cleaner than just using your hands to twist. (I just figured this out and am trying to sound experienced here.) Of course you are going to repeat this entire process to the opposite side of the necklace.

Next, I used a small wire to wrap the top of each ribbon in the exact same fashion as before. For this necklace I left enough wire at the top of the wrap to attach the toggle closures. Next time though, I will attach the wire to the closure first and then wrap the ribbon. So, I suggest trying that way instead.

This photo was taken before I used a lighter to singe the edges of the ribbon just a bit to clean it up.
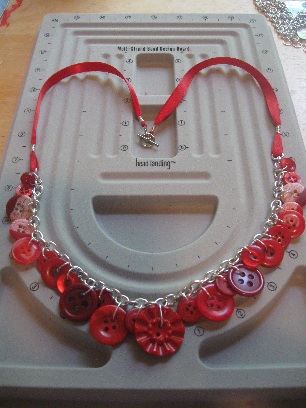
And there you have it, you're own funkalicious button and ribbon creation!
I am going to try some other colors and variations of this- will post pics soon!
DISCLAIMER: "Funkalicious" was not a word in my vocabulary prior to this post... but feel free to use it as your own!


.JPG)